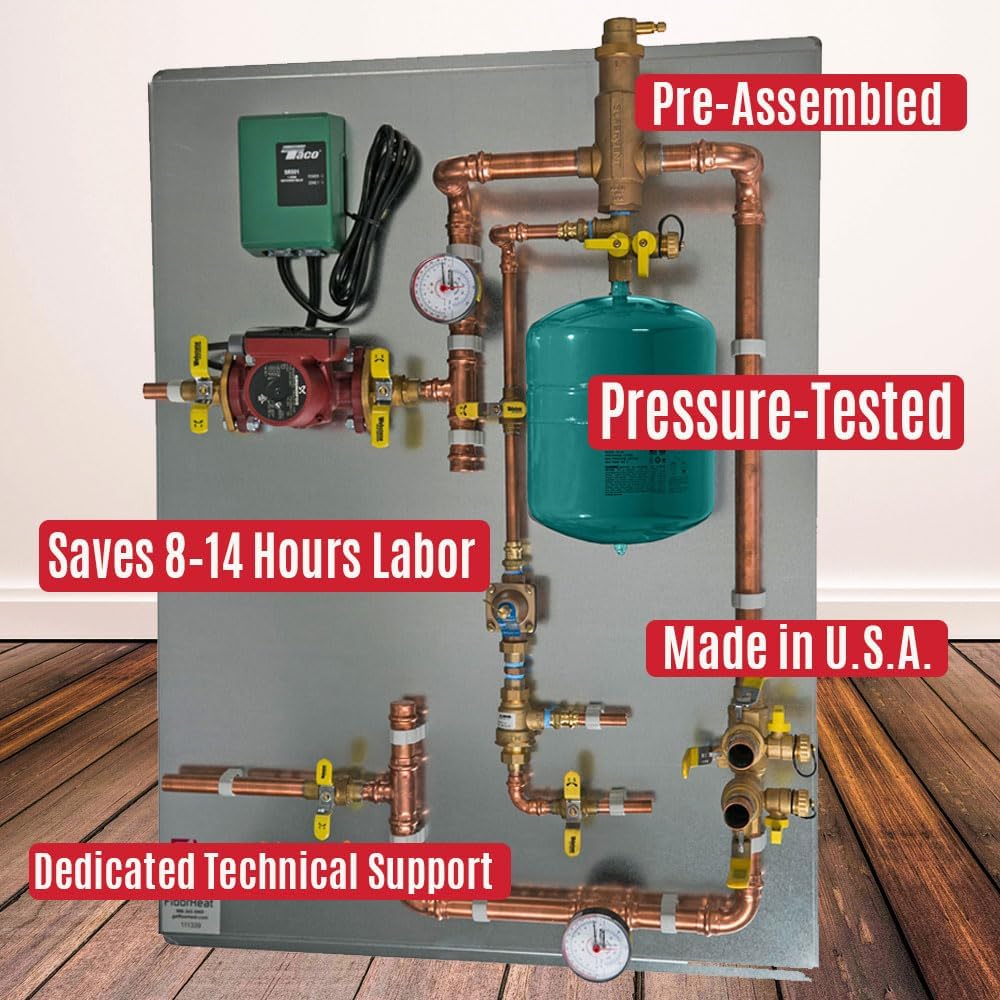
A pre-assembled radiant heat panel is exactly what it sounds like: a factory-built manifold assembly — think of it as a control center — that houses most of the components you’d otherwise source and pipe together yourself: a circulator pump, pressure and temperature gauges, zone valves, an auto-fill valve, and the fittings that connect your boiler to the tubing embedded in your floors or baseboards. The pitch is efficiency. Instead of specifying each component individually, buying them separately, and spending a day on the floor with a torch and fittings, you receive a single pallet, mount the panel, and start making connections. For a hydronic heating system — one that moves hot water through pipes to deliver warmth — that shortcut has real value. This guide is built from aggregated owner reports, installer feedback, and published spec comparisons to give you an honest picture of what the first twelve months actually look like: what works, what fails, and how to set yourself up for the second year without surprises.
| EDITOR'S PICKHydronic Radiant Heat Control P… | Mid-tierHydronic Radiant Heat Control P… | Budget pickHydronic Radiant Heat Control P… | |
|---|---|---|---|
| Zones | 4 | 2 | 1 |
| Pump model | UPSe15-58 | — | — |
| Expansion tank | ✓ | — | — |
| Air separator | ✓ | — | — |
| Price | $4,200.00 | $3,269.07 | $2,540.13 |
| See on Amazon → | See on Amazon → | See on Amazon → |
The Core Value Proposition — and Why It Holds Up
The most consistent thing owners report about pre-assembled radiant panels — particularly the FloorHeat 2-zone and 4-zone lineup — is a version of the same sentence: this is the only way to do this. That’s not marketing language. That’s a buyer who has priced out individual components, mapped the labor hours, and done the comparison honestly.
Here’s what that math looks like in practice:
By the numbers — DIY vs. pre-assembled, 4-zone hydronic panel:
- Component sourcing (pump, valves, gauges, fill valve, manifold fittings): 6–10 hours, 12–18 line items
- Custom assembly and pressure-testing by a licensed plumber: 4–8 hours at prevailing 2026 labor rates ($95–$145/hr in most metro markets)
- Pre-assembled panel installation time reported by owners: 1–3 hours to mount and connect
- Freight damage rate reported across reviewed units: zero incidents noted, palletized FedEx delivery
The logistics side of the FloorHeat experience draws consistent praise in owner accounts. Multiple reviewers noted that the vendor — a representative named Scott appears by name in several accounts — handled pre-delivery coordination through FedEx when units arrived ahead of schedule, and managed a return professionally when a buyer’s heating design changed before installation. That kind of distributor responsiveness matters when you’re mid-project and a component question can stall a pour or a floor finish.
ACHR News has noted in its hydronic commissioning coverage that the single largest source of callback labor on new hydronic installations is components that were under-specified or improperly integrated at rough-in — not the boiler itself. A pre-assembled panel eliminates several of those integration variables by design.
What the First Heating Season Reveals
Here’s where the spec sheet ends and field reality begins.
The most detailed single-owner report in the FloorHeat review corpus covers an 11-month ownership window on both the 2-zone and 4-zone panels. The headline finding: two component failures within the first heating season. Neither was catastrophic. Neither required a full panel replacement. But both required attention, and neither would have appeared on any pre-purchase checklist.
Failure #1: Pressure/temperature gauge developing an internal leak. The PT gauge — the dial that tells you your system pressure and water temperature at a glance — developed an internal weep. This is a known failure mode across hydronic systems generally; PT gauges on lower-cost assemblies use a Bourdon tube mechanism that can develop micro-fractures under thermal cycling. The fix is straightforward (gauge replacement is a union-disconnected swap), but it requires catching the symptom early. A gauge that’s weeping internally will show erratic pressure readings before it shows visible moisture.
Failure #2: Auto-fill valve stopped functioning. The auto-fill valve — sometimes called a pressure-reducing valve or fill valve — is the component that automatically tops off system water pressure when it drops below a set point, typically 12–15 PSI in residential hydronic systems. When it failed, the system required manual monitoring and periodic hand-filling to maintain pressure. Again, not an emergency — but a real inconvenience over a heating season, and a component worth having a replacement on hand for before your second winter.
This Old House’s editorial coverage of radiant hydronic systems consistently flags auto-fill valves and expansion tanks as the two most likely first-year service items on any new hydronic installation. That context matters: these failures in the FloorHeat report aren’t indictments of the panel — they’re consistent with the broader pattern of what wears first in a newly commissioned closed loop.
What performed well: the UPSe15-58 circulator pump. Across owner accounts, the Grundfos UPSe15-58 included in these panels draws specific praise. Owners consistently characterize it as a quality component — notably quieter and more reliable than the pumps they’d previously run on comparable DIY assemblies. HPAC Magazine’s circulator selection guidance notes that the UPS-series pumps from Grundfos are ECM (electronically commutated motor) designs that consume significantly less power than older wet-rotor circulators while maintaining consistent flow across variable system pressures — a meaningful upgrade over the standard circulators bundled into many commodity panel assemblies.
What to Inspect Before and After First Fill
If you’re commissioning a new pre-assembled radiant panel — or inheriting one on a project — here’s the practitioner-level checklist drawn from owner reports and ACHR News commissioning guidance:
Before first fill:
- Inspect all factory-assembled union connections for thread engagement and sealant application. Hand-tight is not sufficient; look for evidence of proper torque.
- Verify the PT gauge reads zero (or atmospheric) before pressurizing. A gauge already showing pressure before fill is either pre-pressurized from factory testing (confirm with vendor) or has an internal fault.
- Confirm the auto-fill valve set point before connecting to supply water. Most residential systems target 12 PSI cold-fill; multi-story systems may need 15–18 PSI depending on elevation.
- Check that zone valves move freely and are wired to the correct thermostat zones before energizing.
After first fill and air purge:
- Watch the PT gauge for the first 48–72 hours of operation. Pressure should stabilize; significant drops indicate air still in the system or a leak. Erratic readings that don’t track with temperature changes warrant gauge inspection.
- Confirm the auto-fill valve cycles off once system pressure reaches set point. A valve that runs continuously is either chasing a leak or has a failed seat — both need immediate attention.
- Per Contracting Business field reporting on water chemistry in closed loops, take a water sample for pH and conductivity testing within the first two weeks. New systems often leach flux residue and pipe manufacturing oils into the loop water, which accelerates component corrosion if left untreated. Fernox or Sentinel inhibitor products are the standard of practice here.
Connecting to an Existing Cast Iron Boiler: What Changes
If you’re integrating a pre-assembled panel into a system with an existing cast iron boiler — a Weil-McLain, Burnham, or Peerless unit, for example — the near-boiler piping configuration matters more than the panel itself.
Cast iron boilers are sensitive to return water temperature. Cold water returning from a radiant floor system (typically 85–110°F supply, 70–90°F return) can cause thermal shock and condensation in a cast iron heat exchanger designed for higher-temperature baseboard systems (typically 160–180°F). The solution is a mixing valve or injection loop between the boiler and the radiant panel — a component the panel itself does not include in most configurations.
HPAC Magazine’s guidance on hydronic system zoning notes that failure to install a low-temperature mixing strategy is one of the most common commissioning errors when integrating radiant panels with legacy cast iron equipment. If your boiler is operating at high-temperature setpoints for existing baseboard zones and you’re adding a radiant floor zone via a new panel, size your mixing valve for the lowest floor zone temperature your design requires — typically 85–95°F for slab-embedded tubing, 110–120°F for thin-slab or staple-up applications.
The UPSe15-58 pump’s variable-speed capability is relevant here: it can modulate flow to maintain delta-T (the temperature difference between supply and return) within a tighter band than a fixed-speed pump, which reduces the severity of cold-return events at the boiler. That’s a meaningful design advantage when you’re bridging a high-temp and low-temp zone on the same cast iron heat exchanger.
Frequently Asked Questions
1. What components are pre-assembled in these panels, and what do I still need to supply?
FloorHeat panels typically include the circulator pump, pressure/temperature gauge, auto-fill valve, zone valves, expansion tank connection port, and manifold supply/return headers with isolation valves. What you supply: the supply water connection, boiler-side piping and connections, zone tubing, a backflow preventer (required by most codes at the supply connection), and — if integrating with a high-temperature boiler — a mixing valve or injection loop assembly.
2. How do I connect a pre-assembled radiant panel to an existing cast iron boiler?
The panel connects to the boiler via supply and return lines, typically 1” or 1-1/4” threaded or sweat connections depending on the panel model. For cast iron boilers operating above 140°F, install a thermostatic mixing valve on the supply side before the panel to reduce water temperature to radiant-appropriate levels. The auto-fill valve on the panel connects to a cold domestic water supply line via a 1/2” connection; install a backflow preventer inline per local plumbing code.
3. What should I inspect on a new panel before the first heating season?
Focus on four items: union joint integrity at all factory-assembled connections, PT gauge zero reading before pressurization, auto-fill valve set point, and zone valve freedom of movement. After first fill, monitor pressure stability for 48–72 hours and verify the fill valve cycles off cleanly at set point.
4. Is the auto-fill valve on these panels reliable, or should I plan to replace it?
Based on the field reports reviewed, the auto-fill valve is the weakest link in the first-year component picture. The 11-month owner report documented a fill valve that stopped functioning within the first heating season. Stocking a replacement valve before your second winter is prudent; auto-fill valves are inexpensive and straightforward to swap on a depressurized system. Per This Old House’s hydronic coverage, fill valves and expansion tanks are the two most common first-replacement items on new hydronic installations regardless of brand.
5. Can I return a pre-assembled panel if I change my heating design before installation?
Based on owner-reported experience, yes — the FloorHeat vendor (Scott, named in multiple reviews) is consistently praised for handling pre-installation returns professionally. Confirm the return window and freight responsibility terms at purchase; palletized returns typically require the buyer to arrange freight, which can run $150–$300 depending on destination.
6. What is the difference between the UPSe15-58 pump included in these panels and a standard circulator pump?
The Grundfos UPSe15-58 is an ECM (electronically commutated motor) wet-rotor circulator. Standard entry-level circulators use older PSC (permanent split capacitor) motor technology, which runs at fixed speed and draws constant power regardless of system demand. The UPSe15-58 modulates speed to maintain a target differential pressure or flow rate, consuming significantly less electricity under partial-load conditions — which describes most of a heating season. Per published Grundfos specifications, ECM circulators in this class consume 15–85W depending on operating point, versus 65–150W for comparable fixed-speed units. For a panel running 150+ days per year, that difference is measurable in annual operating cost.
The decision frame: If your project is a new build or gut renovation where you’re sourcing every near-boiler component from scratch, a pre-assembled panel almost always wins on total installed cost and schedule. If you’re integrating into an existing high-temperature cast iron system, budget for the mixing valve the panel doesn’t include — that’s the component decision that determines whether your boiler survives the first winter of radiant operation. Stock a replacement PT gauge and auto-fill valve before you commission. The pump will take care of itself.