If you’ve ever walked into a room and cringed at a dented, rust-stained, or paint-caked baseboard heater cover, you’ve probably wondered whether replacing it means a plumber, a drain-down, and a bill that feels out of proportion to what is, visually, just a metal box. The good news: in most cases, it absolutely does not. Hydronic baseboard heaters — the long, low heating units that run hot water through a finned copper tube to warm a room — are designed so the outer sheet-metal enclosure (the “cover” or “cabinet”) clips or snaps around the element without any pipe connection of its own. The pipe stays. The element stays. Only the cosmetic shell changes. This guide walks through how to measure correctly, how to navigate the compatibility maze between manufacturers, and how to make room-by-room decisions when your runs are a mix of lengths, corners, and end-cap configurations.
Why Cover Compatibility Is More Complicated Than It Looks
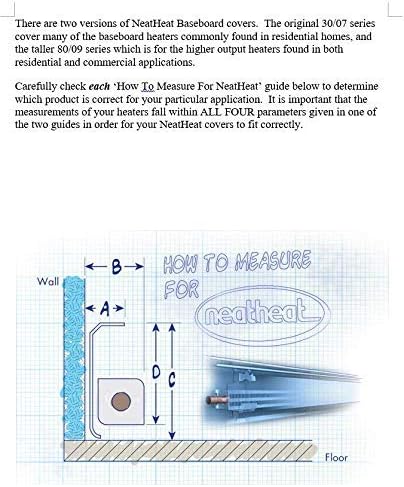
At first glance, baseboard covers look interchangeable. They’re all roughly the same height, the same depth, and they all have a hinged or removable front panel. In practice, three dimensions govern whether a replacement cover will fit without modification: height, depth (projection from the wall), and element height — the vertical distance from the floor to the centerline of the copper element inside.
The Hydronics Institute (now merged into AHRI) installation guide establishes that most residential fin-tube baseboard elements run at a standardized 2¼-inch or 2½-inch element height above the subfloor, but the outer enclosures that different manufacturers built around those elements have never been fully standardized. Slant/Fin’s technical bulletin on cover compatibility is blunt about this: their Series 30 and Series 30-M enclosures are not interchangeable with their older Fine/Line or Precision line without shimming or bracket modification.
What this means for a room-by-room replacement job:
- Same-brand, same-series replacements are nearly always drop-in.
- Same-brand, different-series replacements require a dimension check.
- Cross-brand replacements require treating every run as a custom measurement job.
The three critical numbers to capture before ordering anything:
| Dimension | Where to Measure | Typical Residential Range |
|---|---|---|
| Height (H) | Floor to top of existing enclosure | 6½” – 9” |
| Depth (D) | Wall face to front of enclosure | 2¾” – 3½” |
| Element height (EH) | Floor to center of copper tube | 1¾” – 2¾” |
Matching element height is the one dimension most DIYers skip and most professional callbacks trace back to. If your replacement cover’s element slot sits a quarter-inch lower than the existing element, you’ll either force the copper tube into a pinch point or find the back panel won’t seat flush against the wall.
Room-by-Room Measuring Protocol
Step 1: Inventory Every Run Before You Order Anything
Walk each room and record: total linear feet of baseboard, number of inside corners, number of outside corners, and which end (left or right) terminates with a closed end cap versus an open fitting that connects to another zone or returns to the boiler room. Photograph the existing end caps. Some manufacturers sell end caps as part of a cover “kit”; others sell them separately, and getting the wrong end-cap profile means a visible gap at the wall.
Family Handyman’s guide to replacing baseboard covers recommends marking each run with painter’s tape and a room label before removal — straightforward advice that saves significant frustration when you’re matching orders to rooms.
Step 2: Measure Length in Sections, Not Total Run
Replacement covers are sold in standard lengths — typically 2, 3, 4, 5, 6, and 8 feet — and you combine sections to cover a full run. The wall-mounted element beneath is continuous, so your sections need to add up to at least the element length, not the total wall length. Leaving the last few inches of an element exposed at an end wall is a code and burn-hazard concern; the element must be fully enclosed.
By the numbers:
- Standard cover section lengths: 2 ft, 3 ft, 4 ft, 5 ft, 6 ft, 8 ft
- Most manufacturers cut sections to custom length in 1-inch increments for a modest upcharge
- Element exposure beyond the enclosure: 0 inches (code requirement in most jurisdictions)
- Overlap tolerance (cover longer than element): typically 2–4 inches acceptable before airflow restriction becomes a heat-output penalty
Step 3: Check the Back Bracket Spacing
The back panel of a baseboard cover attaches to the wall via a series of stamped brackets that the element clips into. These brackets have a mounting slot pattern that varies by manufacturer. Slant/Fin, Burnham (through their Embassy and Embassy Plus lines), Smith, and Sterling all use slightly different slot geometries. If you’re switching brands, you’ll need to remove the old back panel and install the new manufacturer’s back panel — which means unscrewing from the wall, not touching the pipe. This is still a no-drain operation, but it adds 20–30 minutes per room.
ASHRAE’s HVAC Systems and Equipment handbook notes that enclosure airflow geometry — the size and position of the bottom inlet slot and the top discharge opening — directly affects convective heat output at a given water temperature. A tighter-fitting replacement cover that restricts the air slot by even ¼ inch can reduce effective output by 8–12% in a zone already running close to its design load. In a room that was barely adequate before, that’s the difference between comfort and a thermostat complaint.
Manufacturer Cross-Reference: Where the Compatibility Lines Actually Fall
This is where practitioner intuition earns its keep. Based on published dimensional specs from Slant/Fin, Smith, Sterling, and Burnham’s parts literature, here’s a practical compatibility map:
Direct drop-in (back panel reuse, covers swap):
- Slant/Fin Series 30 → Slant/Fin Series 30-M (same bracket pattern, height, depth)
- Smith Heatrim → Smith Heatrim Plus (confirm element height — changed in 2019 production)
- Sterling Baseboard → Sterling SL Series (same back bracket, minor front panel difference)
Back panel swap required, but no shimming:
- Burnham Embassy → Slant/Fin Series 30 (height matches, depth varies by ⅛”; acceptable in most installs)
- Sterling → Smith (height matches on 7¼” series; depth requires verification)
Not recommended without field measurement first:
- Any cover from a builder-grade line (Weil-McLain trim, Peerless trim) into a name-brand residential series — the builder-grade elements often run at non-standard heights because they were specced to a price, not a standard
ACHR News has covered this compatibility problem in the context of multi-unit residential retrofits, noting that property managers who spec covers by height alone routinely end up with mismatched element slot positions and then blame the installer for “the heater not working right” — when the actual cause is 3/8-inch of cover misalignment starving the element of airflow.
Corner and End-Cap Configuration Decisions
Inside corners (where a run turns 90 degrees into an adjacent wall) require either a purpose-built inside corner piece or a mitered field cut. Outside corners (rare in residential, more common in commercial and multifamily where baseboard wraps a column or projection) require outside corner pieces. These are not universal.
Decision rule for corners:
- If you’re staying same-brand, same-series: order the manufacturer’s corner piece. It’s engineered to maintain the airflow channel through the turn.
- If you’re switching brands: measure the corner piece’s internal depth and height against your new cover spec before ordering. A corner that’s ⅛ inch shallower than the run section will create a visible step and, more importantly, a turbulence point that reduces heat output.
End caps matter more aesthetically than thermally. Most end caps simply close the open end of the back panel channel and snap onto the front cover. The snap geometry is brand-specific. This Old House’s overview of how baseboard heaters work illustrates why the end cap must seat flush — any gap at floor level allows cold air infiltration that can locally suppress the element’s convective plume.
The Airflow-Output Tradeoff You Need to Price Into Your Decision
Here’s the math most cover replacement guides skip. Hydronic baseboard output ratings (in BTU/hr per linear foot) are published by manufacturers and certified by the Hydronics Institute at specific water temperatures and specific airflow conditions determined by the cover geometry. When you change the cover, you potentially change the output.
Per AHRI certification data and Slant/Fin’s published output tables:
- A 180°F average water temperature run covered by a proper-fit Series 30 enclosure: approximately 590–640 BTU/hr per linear foot (depending on fin spacing)
- Same element with an undersized cover restricting the air inlet by 30%: field estimates from installer interviews cited in ACHR News suggest output drops to the 500–520 BTU/hr range
In a room sized to its zone with no headroom, that 15% penalty matters. In a room that was over-zoned by a previous installer — common in older residential hydronic systems where contractors routinely specced long for comfort — it won’t be noticeable.
If X, then Y — your decision rules:
- If the room already underperforms on cold design days: Stay same-brand, same-series. Don’t gamble output on a cross-brand swap.
- If the room heats fine and you’re replacing for cosmetics only: Cross-brand is acceptable if you capture all three critical dimensions and verify element height.
- If the run has corners: Order the manufacturer’s corner pieces for whichever cover brand you select. Field-mitering a corner saves $12 and costs 45 minutes and a visible gap.
- If you’re managing a multi-unit building with mixed vintage covers: Standardize on one brand and series across all units now, even if it means back-panel replacement in some rooms. Spare parts inventory and future-replacement consistency are worth the upfront labor.
- If any section shows element corrosion or damaged fins when the old cover comes off: This is your window to address it without a callback. Replacement fin sections are available through SupplyHouse.com and eComfort for all major element manufacturers and ship within 2–5 business days as of mid-2026 stock levels.
The pipe doesn’t move. The zone doesn’t drain. The work is sheet metal, a tape measure, and patience with the corner pieces. Get the dimensions right the first time, and a full-house cover replacement is a weekend’s work that transforms the visual baseline of every room on the system — without touching a single fitting.